When creating an environment, chances are you’ll have some parameters and other configuration data like secrets to pass into the config. It could be anything from an API key to the name of the resource you’re creating.
The question you must ask yourself is – where will that configuration data live?
In this blog post, you’ll learn how to combine CloudTruth to store the configuration data and PowerShell to utilize it.
Prerequisites
You will need the following for this hands-on
- An Azure account. You can sign up for a free trial here.
- A CloudTruth account. You can sign up for free here.
- PowerShell installed. If you don’t have PowerShell installed, you can install it here.
- The CloudTruth CLI, which you can find here.
Why CloudTruth With PowerShell?
PowerShell is an interesting “tool.” It was first created for general scripting and automation in Windows environments but has since exploded in popularity outside of Windows. In fact, PowerShell Core (open source version of PowerShell) is one of the 3rd party standard installations on Ubuntu.
You can use PowerShell to do anything from list VMs in Hyper-V, create full environments in Azure, or even build web apps. The options are extremely broad.
Where CloudTruth comes into play is like any other programming language (or if you’d prefer to call it a scripting language), you have configuration data to pass in. Whether it’s the name of a resource you’re creating, the Azure resource group, node count, and everything in between.
Typically, you’ll do one of the following:
- Pass in the parameters/configuration data at runtime for your PowerShell script.
- Store the parameters in the script itself, which is essentially like hard coding the values
With both of those scenarios, it’s not all that efficient.
Instead, it makes far more sense to store the configuration data for each environment (Dev, Staging, Prod, etc.) in a location where it can be easily updated and retrieved.
That’s where CloudTruth comes into play.
The Scenario
PowerShell can be used for a wide variety of needs and implementations. To keep things simple in this blog post, yet to ensure it’s something that almost every PowerShell user can understand from a code perspective, you’ll create a PowerShell script to create an Azure Kubernetes Service (AKS) cluster.
Although this scenario creates an AKS cluster, you can use 95% of this blog post (other than the AKS piece) to create similar scenarios to combine CloudTruth and PowerShell.
Configuring CloudTruth For PowerShell
Now that you know the scenario, it’s time to start creating the CloudTruth resources that you’ll need to make the scenario work. The scenario for this blog post is for AKS, but you can use these same steps for any PowerShell use case.
The two CloudTruth resources that you will need are:
- A CloudTruth project
- CloudTruth parameters
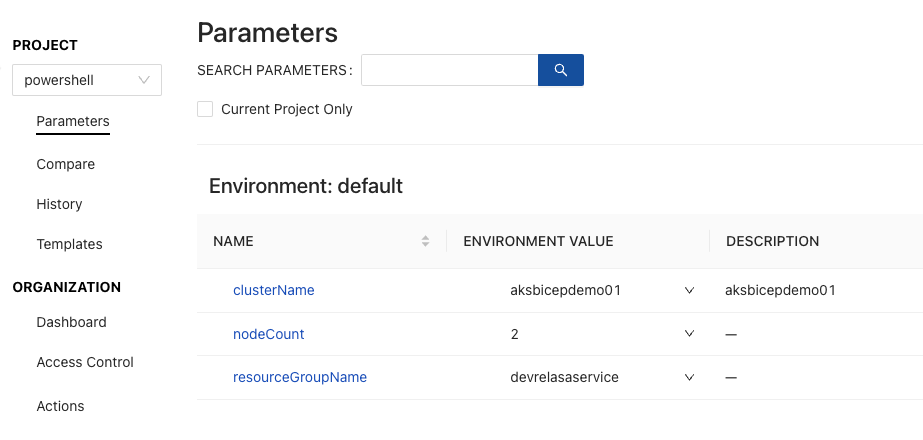
First, create a Project called powershell in CloudTruth.

Next, you want to ensure that you add the proper parameters for the PowerShell code and the parameter values.
You can add them by either utilizing the CloudTruth CLI or the CloudTruth UI.
cloudtruth --project powershell parameter set --value aksbicepdemo01 clusterName
cloudtruth --project powershell parameter set --value 2 nodeCount
cloudtruth --project powershell parameter set --value devrelasaservice resource group name
And that’s it! All you need is a CloudTruth Project to store parameters and the parameters needed for the code. After that, you’re ready to deploy resources with PowerShell.
Using PowerShell and CloudTruth
Once the CloudTruth Projects and Parameters are configured, you can utilize the CloudTruth CLI to retrieve the parameters from the powershell CloudTruth Project.
First, to ensure that this all works, you will need the Azure PowerShell module, which you can install utilizing the following command.
Install-Module -Name Az -Scope CurrentUser -Repository PSGallery -Force
Next, ensure that you are signed into Azure via the following command.
Connect-AzAccount
You should see a similar output as the one below.

Once you’re signed into Azure and the PowerShell Azure module is added, you can start to write code to use for Azure. The section above states we are going to create an AKS cluster using PowerShell. To do so, you can use the code/one-liner below and save it to a file called aks.ps1 to use in the next step.
New-AzAksCluster -ResourceGroupName $env:resourceGroupName -Name $env:clusterName -NodeCount $env:nodeCount
The final step is to utilize the CloudTruth CLI to specify the powershell CloudTruth project and then call upon the PowerShell code.
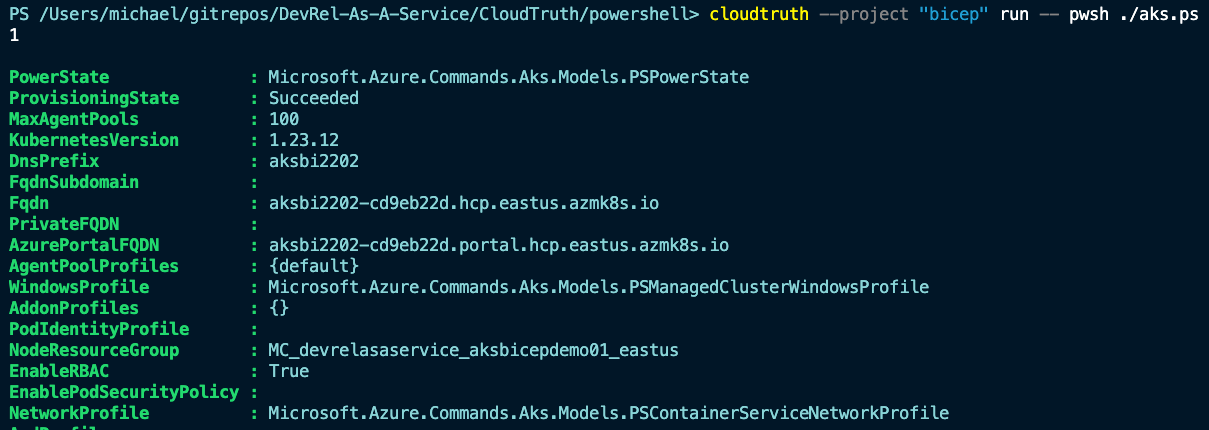
cloudtruth –project “powershell” run — pwsh ./aks.ps1
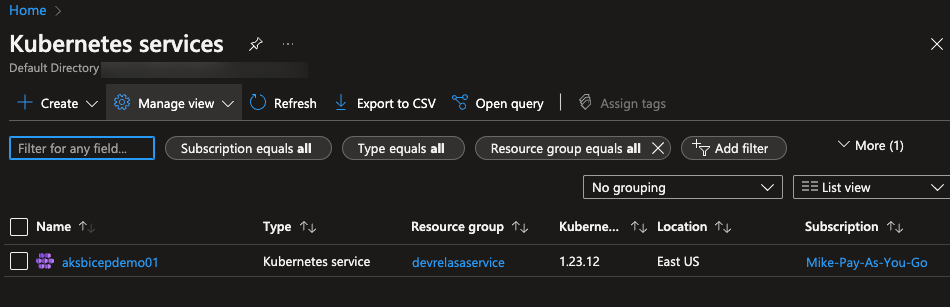
You won’t see an output on the terminal when running the above command immediately. You’ll see the output once the AKS cluster is ready. However, if you log into the Azure portal and go to the AKS service, you’ll see a screen similar to the screenshot below.
After the AKS cluster is created, you’ll see an output on the terminal similar to the screenshot below.
Congrats! You have successfully learned how to utilize PowerShell and CloudTruth to create deployments based on parameters that are stored in CloudTruth.
Here’s a brief screencast video walkthrough:
Join ‘The Pipeline’
Our bite-sized newsletter with DevSecOps industry tips and security alerts to increase pipeline velocity and system security.